Honestly, who among us hasn’t ended up with a massive stash of crinkly, colorful tissue paper after a birthday or the holidays?
I mean, you feel guilty throwing it away, but you’re not actually going to re-use it for wrapping, right?
It just sits there, taking up space in a drawer, looking all pretty and perpetually ignored.
You know what? That needs to stop!
Here’s the thing: tissue paper is one of the most underrated crafting materials out there.
It’s cheap, it comes in every color imaginable, and it’s surprisingly versatile.
And it’s even perfect for adding that gorgeous pop of color or texture to your home décor.
We’re talking about transforming those thin, delicate sheets into show-stopping pieces that look way more expensive than they are.
We’re going to rescue that forgotten stack and turn it into 21 insanely fun, totally doable craft projects.
Get ready to embrace the crinkle and the color!
Let’s get crafting!
1. Sparkle Bouquet

This craft is guaranteed to make your next party feel instantly more whimsical and fun.
I actually made a slightly messy version of this for my niece’s birthday, and the kids absolutely loved it.
You just gather up those soft, pale tissue colors and fluff them into a beautiful, billowy puff, then secure it to a paper cone.
The best part? Those glittery gold stars!
They add that essential touch of glam that transforms simple paper into a dazzling decoration.
You will find this is way more cheerful and affordable than buying real flowers.
2.
Honestly, these bright, fluttering tassels are the easiest way to make a space feel like a celebration instantly.
You simply cut strips into stacked sheets of tissue paper, roll them up, and then you twist the top loop to hang them.
I made about twenty of these for a recent backyard party, and they looked amazing strung across the fence.
They use up a ton of your tissue paper stash fast, which is a major bonus for decluttering.
You’ll find that mixing bold colors, like pink, turquoise, and yellow, makes the final garland really pop.
It’s a simple, high-impact craft that adds incredible movement and festive energy to any room.
3. Flame Streamers

These are the easiest party decorations you can make, and you’ll feel like a crafting wizard when you’re done.
I love using tissue paper for flame crafts because that airy material catches the slightest breeze.
You simply cut long, fiery strips of red, orange, and yellow tissue paper.
Then you gather them and tape them to the end of a stick, a dowel, or even a toilet paper tube for instant firework fun.
It’s such a simple way to add dramatic color and movement to any holiday or party celebration.
4. Pumpkin Suncatcher

This project is a fall favorite, and honestly, it’s one of the best ways to get little kids involved in crafting.
I made a few of these for my kitchen window last year, and the light streaming through was gorgeous.
You cut out a simple shape…like this pumpkin, and then you let the kids fill the center with little glued-down tissue squares.
The way the colors overlap creates a stunning, stained-glass effect when you hang it in a window.
It uses up all those small, awkward tissue scraps and makes the final piece totally unique.
5. Watercolor Rose

I was genuinely shocked when I saw how realistic and gorgeous you can make flowers using just tissue paper.
This project uses a clever technique where you gently dampen the edges to create a watercolor bleeding effect.
That subtle red coloring along the petal tips makes the final flower look incredibly sophisticated, not cheap or childlike.
It’s surprisingly meditative to layer those thin, delicate petals one by one to build up the full, round shape.
You can make a dozen of these for almost nothing to create a beautiful, maintenance-free centerpiece.
6. Textured Canvas
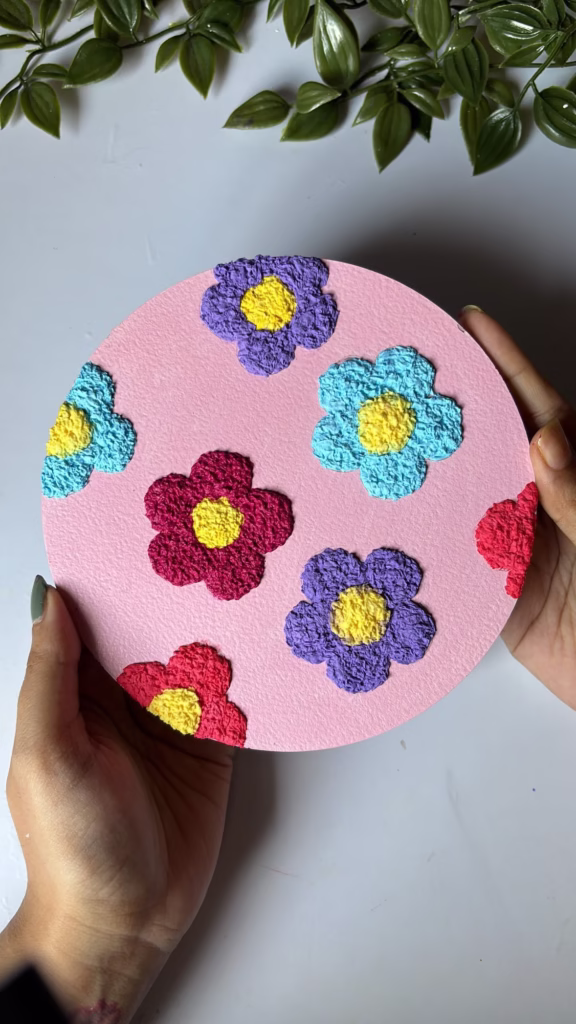
This is one of my favorite projects because it takes simple paper and turns it into sophisticated, tactile wall art.
I love the way you crumble and glue down the tissue paper to create that amazing, raised, three-dimensional texture on the petals.
The bright, bold colors of the flowers pop beautifully against the soft pink background, giving it a playful, retro vibe.
It is surprisingly easy to create a fun pattern like this, even if you think you can’t draw a straight line.
You can use a simple cardboard round for the base, making it extremely cost-effective.
7. Kaleidoscope Disk

You simply must try this version of the suncatcher, because the results look so intricately complicated.
I actually made a set of these for my sliding glass door, and they turn morning light into a beautiful color show.
The trick is layering different colors and shapes of tissue paper to create that stunning, geometric kaleidoscope effect.
You can frame the circle with a dark cardstock ring to really make the bright colors pop against the glass.
They stick right onto your window with a bit of water or clear glue, making installation incredibly easy.
8. Paper Mâché Figure

This is the perfect project for all those colorful tissue scraps you have piled up in your crafting drawer.
I actually made a giant giraffe using this technique, and the final look was amazing and durable.
You build a simple wire base and then layer strips of colorful tissue paper soaked in a simple glue and water mixture.
The layering allows you to blend colors and create a fun, vibrant texture that is totally unique.
It’s messy, yes, but incredibly satisfying to build a three-dimensional sculpture from almost nothing.
9. Honeycomb Pom-Poms

These giant pom-poms are fantastic because they use up large sheets of tissue paper and make a massive impact.
I hung a bunch of yellow and black ones from my porch last year, and they looked exactly like giant, fluffy honeycombs.
You simply stack the sheets, fold them accordion-style, and then use scissors to round the edges before fluffing them out.
They look complicated, but they are surprisingly easy and a ton of fun to make in bulk for a large party or event.
10. Crinkle Tree Art
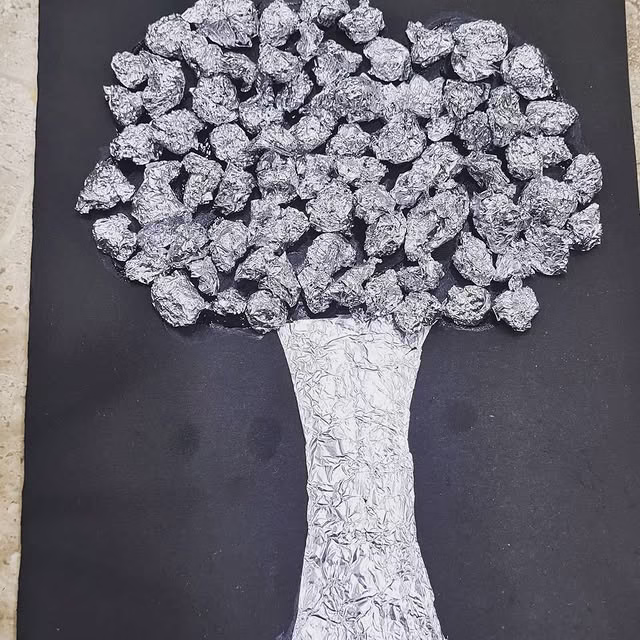
This is a wonderful project that uses the texture of crumpled tissue paper to create beautiful foliage.
I love using deep greens and reds in the fall to make a striking, colorful canopy that really pops off the page.
You take small squares of tissue paper, crumple them up into little balls, and then glue them tightly onto a sketched tree shape.
The texture created by all the little paper balls is incredible, giving the final piece a fun, dimensional quality.
It’s a fantastic sensory activity for kids, and the final piece looks great hung up.
11. Flower Garland

I swear, stringing these little blooms together is the easiest way to give any room a huge, cheerful makeover.
You just twist small squares of tissue paper into a simple flower shape and attach them to a long piece of twine or string.
I made one for my fireplace mantle, mixing pinks, purples, and blues, and it seriously looks like a field of tiny flowers.
It uses up a variety of colors beautifully, even those random odd sheets you don’t know what to do with.
Plus, unlike real flowers, this garland lasts forever and adds a lovely, subtle texture to your wall.
12. Giant Puffy Flowers

If you want decorations that make a huge, colorful statement without spending a fortune, this is the project for you.
I actually made a whole wall of these for a wedding shower, and they looked incredibly professional and dramatic.
You layer about ten sheets of tissue paper, fold them accordion style, and then round the edges before gently fluffing them into a perfect circle.
The size and softness of the tissue make these flowers look almost cloud-like and so cheerful.
You can mix different shades of pink or yellow to get an even more dimensional, realistic effect.
13. Bleeding Hearts

This might be the easiest way to create stunning, watercolor-style artwork using nothing but tissue paper and water.
I love this project because the colors bleed and swirl together to create amazing, unplanned patterns every single time.
You simply cut your desired shape from thick paper, then place damp squares of brightly colored tissue paper all over it.
When you peel the wet tissue paper away, the color bleeds onto the cardstock underneath, leaving a beautiful tie-dye effect.
14. Butterfly Mobiles

This project is simply gorgeous, and I love how the vibrant colors truly mimic the look of stained glass.
I actually made these butterflies for a sunroom, and the light streaming through the layered tissue paper was beautiful.
You cut out the butterfly shape and then use little pieces of colored tissue, like a collage, securing them with glue sticks.
The small clothespin body and the pipe cleaner antennae are the perfect, cute touch that brings them to life.
You can hang them from a branch or use them as curtain tiebacks.
15. Pom-Pom Letters
This is such a clever way to personalize your décor, and it looks surprisingly clean and artistic.
I made the letter ‘L’ for my living room, and the soft, fluffy texture of the tissue pom-poms looks amazing on the wall.
You start with a simple cardboard letter cut out, then cover it completely with small, dense, crinkled tissue paper balls using a hot glue gun.
You can stick to one color, or mix shades, but the key is placing them close together to get a lush, dense texture.
This project uses up those small tissue scraps and turns them into something bold and dimensional.
16. Jar Lanterns
You simply have to make these decorative lanterns, they are beautiful, cheap, and surprisingly durable.
You apply a layer of simple craft glue, stick on your tissue pieces in an overlapping mosaic pattern, and then seal it all with another layer of glue.
The finished effect is a stunning, glowing stained-glass look when you drop in a simple battery-powered tea light.
They are perfect for adding cozy, colorful light to an outdoor patio or a dark bookshelf.
17. Ice Cream Cone
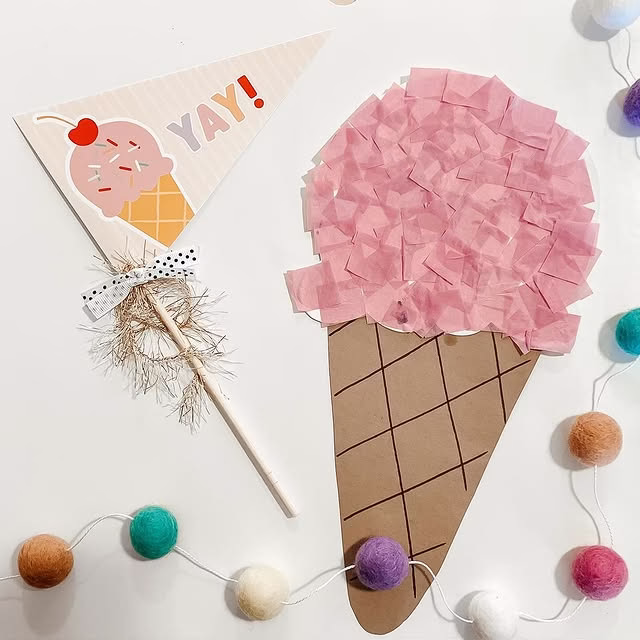
I love this project because it is impossible to look at this cheerful decoration without smiling.
I actually made a slightly misshapen one last summer, and it was perfect for a backyard barbecue theme.
The cone part is made from simple cardboard or brown paper, and you simply glue that gorgeous, crinkled tissue for the ice cream scoop.
You can layer the tissue paper for a textured, realistic scoop effect, or use different colors to make it look like rainbow sherbet.
18. Matisse Collage

This abstract art is actually one of the simplest and most striking ways to use large sheets of tissue paper.
I made a huge version of this for my dining room, and everyone thinks it’s an expensive, framed piece of modern art.
The secret is channeling artist Henri Matisse:
You simply cut out large, bold, free-form shapes and layer them.
Because tissue paper is translucent, the overlapping colors create entirely new shades, giving the art incredible depth.
You can use a contrasting background color to make the bright cutouts truly pop.
19. Rainbow Arch

This is such a cheerful, happy craft, and it’s truly the perfect project for little hands.
I love the way this design uses three different tissue paper techniques for three completely unique rainbows.
You have the simple squares, the beautiful crinkled strip border, and the solid tissue color mosaic!
Mixing up the texture like this keeps the project visually interesting and gives you three different ways to use your paper scraps.
It’s such a bright, colorful way to teach kids about colors and weather while using that paper stash.
20. Crinkly Monsters

This is a perfect craft for letting your imagination, and your tissue paper supply…run wild with colorful chaos.
I actually made a whole family of these little monsters for Halloween, and they looked amazing lined up on the mantle.
You create a small base shape from cardboard and then cover the entire thing by gluing down random, crumpled tissue paper bits.
The beauty is that the crinkled texture makes them look furry and totally unique, and there is no right or wrong way to do it.
21. Colorblock Window

This is the ultimate minimalist way to use tissue paper, and it makes any window look incredibly modern.
I actually did this to cover an ugly window in my laundry room, and the effect was a beautiful, soft, colorful glow.
You simply cut large, geometric squares or rectangles of different colored tissue paper.
Then, you arrange them in a clean grid pattern directly on the window glass, overlapping the edges slightly.
Because the tissue is sheer, the light filters through and casts beautiful, subtle colors onto your floor.